How to install tiles outside
May 18, 2022
In this article, we show you all the steps you need to take to install your tiles outside.
Installing tiles outside can be done DIY but we recommend you seek consultation from certified builder, tiler or architect before you start tiling yourself.
No matter what you are doing make sure you are following safety guidelines. Always wear safety gear such as masks and gloves and be careful when you are using the tools.

There are different kinds of products you can choose to have outside. You can go for natural stones such as limestones or travertines, or you can use porcelain tiles.
How to lay porcelain tiles outside
Here we are talking about places like patios or any flat surface that can be tiled.
1. Calculate the areaThe first thing you want to do is to mark the place and get the surface ready for work.

This includes cleaning the surface by just brooming it. No need to get too tidy but a simple brush can help. Most importantly you want to mark the area of work to figure out the meterage of the tiles needed.
To do this, simply calculate the length and width and multiply them. If your surface is not as straightforward divide the area into smaller rectangles and squares and calculate each separately.
Put strings on every length and width. This is going to help you both in calculating the surface and in installing the tiles.
2. Apply protective coating
Porcelain doesn’t need coating outdoor. Unlike natural stone, porcelain is not water absorbent. However, for easier installation putting coating is recommended.
Having a layer of coating on your porcelain tiles helps in keeping it clean and making sure the slurry and mortar do not stick to it.
Apply the coating to the tiles with a roller. Ensure you are not coating the sides. You need to keep the sides uncoated for grouting.
We recommend using KF Stain Stop for this.

3. Prepare the surface
The surface needs to be ready for tile instalment. Now you may already have a concrete surface which is much easier. Or you might even have a tiled surface. That’s also fine. You can just tile on top of it.
But if you are tiling a part of your garden and you have grass or soil you need to dig the ground and smooth it out. Its depth should be between 15 to 20 centimetres.
Creating a slope
When preparing the surface you need to make sure the surface has a nice and smooth slope for drainage. If you are tiling a patio then the slope should be directed away from the building. If it is in the garden it depends but you get the idea!
Filling the area
After you have dug out the soil (only if you are tiling in the garden of course) you need to fill it with 10 to 15 centimetres of hardcore. Use a power plate to compress the hardcore and even it out.
While doing this keep in mind the direction of the slope.
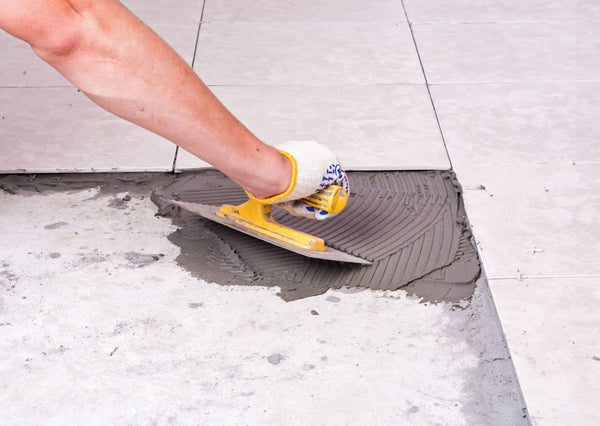
4. Apply the mortar
Now it’s time to make that sticky mortar and apply it to the surface. We recommend four parts of sand for every part of cement.

5. Apply primer
Place your tiles backwards, get a big bucket and fill it with seven litres of water. Then add the slurry slowly into the water and mix it. After the mixture is smooth and lump-free use a roller to apply the mixture to the bottom of your porcelain tiles.
This layer of coating ensures that your tiles properly stick to the mortar.
6. Place the tiles on the surface

Choose a comfortable corner and place your first tile on it. It’s best to use a corner next to a wall.
Use a rubber mallet to push it down and to make sure it sticks to the mortar.
Don’t forget to use a level to adjust the drainage slope.
Continue laying the tiles on the floor like this. Give a 3 to 5 mm space between the tiles. You can use a tiles spacer for this.
Use a sponge to clean each tile after laying them.
This part can take a long time depending on the surface of your projects.
Don’t make so much mortar that it goes to waste. Take your time with putting the tiles, especially if you are not a professional and have not done this sort of work.
7. Apply grout

Make sure not to step on the tiles for one to two days until they harden perfectly.
Then you need to apply the grout.
Make the grout in a bucket, and apply it with a trowel.
There are different colours of grout you can choose from. This depends on the design you have in mind. Consider the colour of your grout when you are purchasing your tiles.
You can always go for white which is the most common colour for grouts but dark colours could also bring out a nice contrast.
Keep cleaning the tiles using a sponge while your are applying and once you are done. Use a sponge that is very lightly moisterised not to dilute the grout.
After you are are done applying the grout, sit back and appreciate your work!
8. Final touches
One of the most important final touches is applying sealer to the tiles. Sealer helps in keeping the tiles water-resistant. As the tiles are going to be outdoor and will definitely be exposed to water, this is a critical step in maintaining your tiles beautifully.
How to install natural stone pavers outdoor
Installing natural stone pavers is not all that different from porcelain but there are some extra steps you need to make sure of.
Let’s look at different types of natural stones available for outdoor pavers and tiles.
What is travertine

Travertine is a calcite based natural stone. It is close to limestones but it is more porous than limestones.
Travertine is considered an affordable choice among natural stones in the market and it comes in a variety of colours such as brown and silver. The most popular colour used is light cream and beige tones.
Travertine pavers are a popular choice for outdoor areas. However, you should bear in mind that much like any other natural stone, there are maintenance considerations that you should take into account. Travertine can get stained. Therefore, it is recommended to use a layer of coating or sealing. Alternatively, you can use porcelain travertine lookalike but they might be slippery and travertine does not get hot because of calcite.
What is Limestone

Limestone is a form of calcite based natural stone that is formed through many years of compression. There are various limestones but usually, they absorb water more than marbles do.
There is some maintenance that needs to be considered if you choose to install limestone in your home. Applying protecting sealing is highly recommended.
Limestones are a very popular option for outdoor pavers and tiles, especially with a tumbled finish they can bring out such class to your outdoor area.
What is Marble

Marble is also calcite based but it is formed through getting heated therefore it has a higher resistance. Marbles require less maintenance than limestones. However, sealing it is still highly recommended for better preservation.
Installing natural stone pavers
There are different methods on installing natural stone pavers outside. Make sure your contact your builder or contractor prior to installation to find out the best way of installing natural stone tiles outside.
The most recommended method is having a layer of compact roadbase underneath the stones and having the stones laid on a layer of mortar.
Another method that is more costly but recommended by many tilers is having a layer of concrete slab underneath the stones to make it smooth and them installing the natural stone tiles on top of that.
It really depends on the use of the surface. For example, if you are going to have heavy things like cars on the surface it’s recommended to have the cement layer.
Here, we explain both briefly.
Installing natural stone tiles with a cement layer:
1. First, you need to pour a layer of concrete slab with a 125 mm thickness. It takes about 2 weeks for the concrete to cure and harden sufficiently.2. Make sure you water proof your concrete slab. This is a crucial step. If your concrete slab is not water proofed you might have problems later with your natural stone. You can use sealing product. Our recommended product is Hydro Ban. It’s an easy to use and affordable solution for waterproofing.
Flemish Bond Pattern


We recomend using Latricete 335 Premium Flexible Adhesive. Ensure you give about 3mm between the tiles for adjustment.
4. Once you’re done with laying the tiles and the adhesive has done its work you can go to the next step which is grouting.
But before you start the grouting process you need to seal the tiles. We offer Lithofin sealer for natural stone. This is a ready-to-use sealer suitable for all natural stones.
You can use Laticrete grout that comes in various colours. Mix the grout with water in a bucket as described on the packaging. The grout should have a toothpaste density. Use a trowler to apply the grout and remove the excess grout from the tiles using a piece of cloth.
Once you are done use a slightly wet sponge to clean the tiles. It’s important that you do this right after grouting so the grout does not stick to the tiles. You can use Lithofin Algex Special Outdoor Cleaner to clean the tiles easier.
5. You are almost done!
The final step is to apply another layer of sealer to the grout and the tiles to ensure highest level of resistance against moisture and temperature.
Using Roadbase instead of concrete slab:
As mentioned above, there are a few methods in installing natural stone tiles outdoor. If you are not using the space as driveway or the surface does not have too many bumps, you can use roadbase instead of concrete slab.

